Overview
Teaching: 45 min
Exercises: 0 minQuestions
What is a Self-Signed SSL Certificate?
How can we create one?
What is a Trusted Certificate Authority?
What is a Diffie-Hellman group?
How do we configure Apache to use our certificate?
How do we test to ensure that encryption is working?
Objectives
Create a self-signed SSL certificate.
Create a Diffie-Hellman group
Configure Apache to use this certificate.
Create a permanent redirect.
Verify that encryption works.
In this episode we’ll create a self-signed SSL certificate to use with our Apache server in order to secure communication with our WordPress application. SSL stands for Secure Sockets Layer. It has recently been replaced by Transport Layer Security (TLS). However, during this course, we’ll still refer to it as SSL, as this seems to be the acronym that is referenced most frequently in most documentation.
The purpose of using SSL certificates is as follows:
- the connection uses symmetric cryptography to encrypt all transmitted data
- use of trusted cryptographic keys ensures that the identity of the web server can be authenticated
- since each message includes a message authentication code, the connection can ensure data integrity (ie. there has been no loss or alteration of data)
There are two methods of creating SSL certificates. You can pay to purchase one that will be signed by a trusted certificate authority, such as GoDaddy, Symantec, Verizon, DigiCert, etc. Or you can create your own self-signed SSL certificate. While both types of certificates will encrypt communication between our web browsers and the WordPress server, self-signed certificates cannot be used to validate the identity of our web servers. For this reason, in production environments, it is recommended that you purchase digital certificates from a trusted certification authority. Even so, for the purposes of this course, a self-signed certificate will suffice. Self-signed certificates are still very useful for working with applications in a development, test, or educational environment (like this course, for example) – or for any situation in which it is too cost prohibitive to purchase trusted certificates. Self-signed SSL certificates will still encrypt network traffic when users or administrators log into WordPress using password authentication in order to create and maintain content, as well as modify configuration settings. Naturally, this is communication that we REALLY don’t want to be transmitting across the wide-open Internet in plain text.
Creating the SSL certificate
Before we can create our certificate, we need to make certain that the OpenSSL package is installed. It should already be there but, in case that it is missing, please perform the following:
$ apt update
$ apt install openssl
TLS/SSL works by using both a public certificate (which we share) and a private key (which is kept secret at all times and remains on the server). Basically, the certificate is shared with any user who requests content from our web site and it is used to decrypt each transmission which had already been encrypted by the private key.
The process is as follows:
- we will issue a command to create the certificate/private key
- then we will be asked a series of questions which help to identify our web site
The command looks like this:
$ sudo openssl req -x509 -nodes \
  -days 365 -newkey rsa:2048 \
  -keyout /etc/ssl/private/apache-selfsigned.key \
  -out /etc/ssl/certs/apache-selfsigned.crt
Before considering any output, let’s go over what that command really does. First, you are executing both sudo and openssl to invoke administrator access and create the SSL certificate and private key. However, the command itself requires a lot more information, such as:
req: We would like to use the X.509 certificate standard.x509: We want to make a self-signed certificate, so please don’t bother generating certificate signing request.-nodes: Please skip the option to secure this certificate with a passphrase.-days 365: Please keep this certificate valid for 1 year.-newkey rsa:2048: Please create a secret key at the same time. Please make it an RSA key that is 2048 bits strong.-keyout: This is the file path in which to store our new secret private key.-out: This is the file path in which to store our new SSL certificate.
Now to deal with the series of questions that help to identify our web site.
You will first be prompted to identify your location information, such as Country, State or Province, and City.
Generating a 2048 bit RSA private key
................................................................+++
..........+++
writing new private key to '/etc/ssl/private/apache-selfsigned.key'
-----
You are about to be asked to enter information that will be incorporated
into your certificate request.
What you are about to enter is what is called a Distinguished Name or a DN.
There are quite a few fields but you can leave some blank
For some fields there will be a default value,
If you enter '.', the field will be left blank.
-----
Country Name (2 letter code) [AU]:CA
State or Province Name (full name) [Some-State]:British Columbia
Locality Name (eg, city) []:Vancouver
Next, you will be asked to provide some information about your organization or place of employment.
Organization Name (eg, company) [Internet Widgits Pty Ltd]:Province University
Organizational Unit Name (eg, section) []:Research Computing
Finally, you will be asked to provide information about your server. NOTE: for Common Name, you can just provide the external IP address of your virtual machine.
Common Name (e.g. server FQDN or YOUR name) []:206.167.181.126
Email Address []:admin@fake.org
And that’s it. You can verify the creation of your private key as follows:
$ $ sudo ls -l /etc/ssl/private/
-rw-r--r-- 1 root root 1708 May 4 19:45 apache-selfsigned.key
You can also verify the creation of your public SSL certificate:
$ ls -ltr /etc/ssl/certs/
...
whole bunch of other certificate files ...
...
-rw-r--r-- 1 root root   1501 May  4 19:45 apache-selfsigned.crt
Creating a Diffie-Hellman group
At the same time, we should also create what’s called a Diffie-Hellman group. What is that? Good question.
Diffie-Hellman groups determine the strength of the key that is used during an encryption key exchange process. There is a trade off. Higher group numbers are more secure but they require longer duration to compute the key. As a consequence, we’ll create one that will match the strength of the RSA private key that we created in the previous section. Please note, this will take more than a few moments.
$ sudo openssl dhparam -out /etc/ssl/certs/dhparam.pem 2048
Generating DH parameters, 2048 bit long safe prime, generator 2
This is going to take a long time
................................................................
.......................+......................................+.
[and so on for more than a screen length...]
......................+..........................+..............
++*++*
After the command has completed, your stong DH group file will be stored here:
/etc/ssl/certs/dhparam.pem
We will reference this file path in the very next section.
Configure Apache to use your certificate
The next step is for us to modify our Apache configuration and tell it how to use the certificate, private key, and Diffie-Hellman group that we created in the previous section.
Our modifications will include the following:
- create a configuration snippet to specify our default SSL settings
- modify our SSL Apache Virtual Host file to reference our credentials
- modify the unencrypted Virtual Host to automatically redirect HTTP requests to our encrypted Virtual Host using HTTPS
Apache configuration snippet with default SSL settings
In this section, we will set up Apache with a strong SSL cipher suite and enable various advanced features in order to make our web server more secure. Basically, we are just ‘hardening’ Apache SSL. To do so, we need to create a new file called ssl-params.conf.
$ sudo nano /etc/apache2/conf-available/ssl-params.conf
To make this simple, we will just copy and paste the contents listed below which were created by Remy van Elst and published on the Cipherli.st web site.
# from https://cipherli.st/
# and https://raymii.org/s/tutorials/Strong_SSL_Security_On_Apache2.html

SSLCipherSuite EECDH+AESGCM:EDH+AESGCM:AES256+EECDH:AES256+EDH
SSLProtocol All -SSLv2 -SSLv3
SSLHonorCipherOrder On
# Disable preloading HSTS for now.  You can use the commented out header line that includes
# the "preload" directive if you understand the implications.
#Header always set Strict-Transport-Security "max-age=63072000; includeSubdomains; preload"
Header always set Strict-Transport-Security "max-age=63072000; includeSubdomains"
Header always set X-Frame-Options DENY
Header always set X-Content-Type-Options nosniff
# Requires Apache >= 2.4
SSLCompression off
SSLSessionTickets Off
SSLUseStapling on
SSLStaplingCache "shmcb:logs/stapling-cache(150000)"

SSLOpenSSLConfCmd DHParameters "/etc/ssl/certs/dhparam.pem"
Then save and exit this document. NOTE: the SLOpenSSLConfCmd DHParameters attribute references your Diffie-Hellman group file path.
Default Apache SSL Virtual Host configuration file
The next thing we need to do is edit /etc/apache2/sites-available/default-ssl.conf.
Open the file in nano.
$ sudo nano /etc/apache2/sites-available/default-ssl.conf
Under the ServerAdmin webmaster@localhost line, add your web server’s external IP address. Mine is 206.167.181.126, so my entry looks like the one below:
ServerName 206.167.181.126
Next, replace the SSLCertificateFile and SSLCertificateKeyFile entries with the following:
#SSLCertificateFile     /etc/ssl/certs/ssl-cert-snakeoil.pem
#SSLCertificateKeyFile /etc/ssl/private/ssl-cert-snakeoil.key
SSLCertificateFile      /etc/ssl/certs/apache-selfsigned.crt
SSLCertificateKeyFile /etc/ssl/private/apache-selfsigned.key
Finally, uncomment the following section:
#   "force-response-1.0" for this.
# BrowserMatch "MSIE [2-6]" \
#               nokeepalive ssl-unclean-shutdown \
#               downgrade-1.0 force-response-1.0
So that it looks like this:
#   "force-response-1.0" for this.
BrowserMatch "MSIE [2-6]" \
               nokeepalive ssl-unclean-shutdown \
               downgrade-1.0 force-response-1.0
Then save and exit the document.
Redirect unencrypted Virtual Host requests to use HTTPS
At this point, your server will provide both HTTP (unencrypted) and HTTPS (encrypted) web traffic. However, this is not a best practice. Rather, it is recommended that you redirect HTTP to HTTPS automatically, whenever possible.
To enable this, we need to modify /etc/apache2/sites-available/000-default.conf.
Open the file in nano.
$ sudo nano /etc/apache2/sites-available/000-default.conf
Inside the VirtualHost configuration blocks, we need to add a Redirect directive which effectively routes all web traffic to the SSL version of our web site. Once again, you must substitute your web site’s own external IP address. Since my IP address is 206.167.181.126, my entry looks like the one below:
<VirtualHost *:80>
        . . .

        Redirect permanent "/" "https://206.167.181.126/"

        . . .
</VirtualHost>
Then save and exit the file.
Enabling Apache modules and implementing the configuration changes
After making these changes, the next step is to enable SSL and header modules in Apache, enable the SSL-prepped Virtual Host, and finally restart the Apache service.
To enable the appropriate modules, we will use the a2enmod command.
To enable SSL:
$ sudo a2enmod ssl
Considering dependency setenvif for ssl:
Module setenvif already enabled
Considering dependency mime for ssl:
Module mime already enabled
Considering dependency socache_shmcb for ssl:
Enabling module socache_shmcb.
Enabling module ssl.
See /usr/share/doc/apache2/README.Debian.gz on how to configure SSL and create self-signed certificates.
To activate the new configuration, you need to run:
  service apache2 restart
To enable mod_headers:
$ sudo a2enmod headers
Enabling module headers.
To activate the new configuration, you need to run:
  service apache2 restart
To enable the SSL Virtual Host:
$ sudo a2ensite default-ssl
Enabling site default-ssl.
To activate the new configuration, you need to run:
  service apache2 reload
And finally, to enable ssl-params.conf:
$ sudo a2enconf ssl-params
Enabling conf ssl-params.
To activate the new configuration, you need to run:
  service apache2 reload
Now that all of the necessary modules have been enabled, it is a good idea to make sure that there are no errors in any of our Apache configuration files.
$ sudo apache2ctl configtest
The expected output should be:
Syntax OK
If this is the case, then we can safely implement our modifications by restarting the Apache service.
$ sudo systemctl restart apache2
Check the Apache service status by running:
$ sudo systemctl status apache2
And check for the line which reads Active: active (running)....
Verify that encryption works
We are now ready to test our SSL web server. Open a browser and simply point to the HTTP version of your URL. For my example, the URL was as follows:
http://206.167.181.126
If both SSL and the redirect worked successfully, then you should be presented with the following warning (if you are using Firefox):
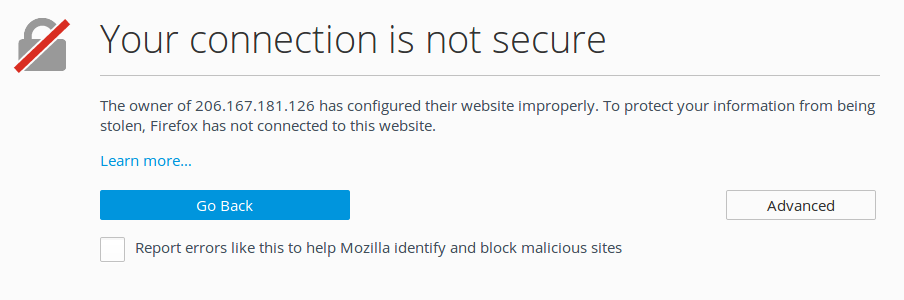
Click the Advanced button. This will expand the page as follows:
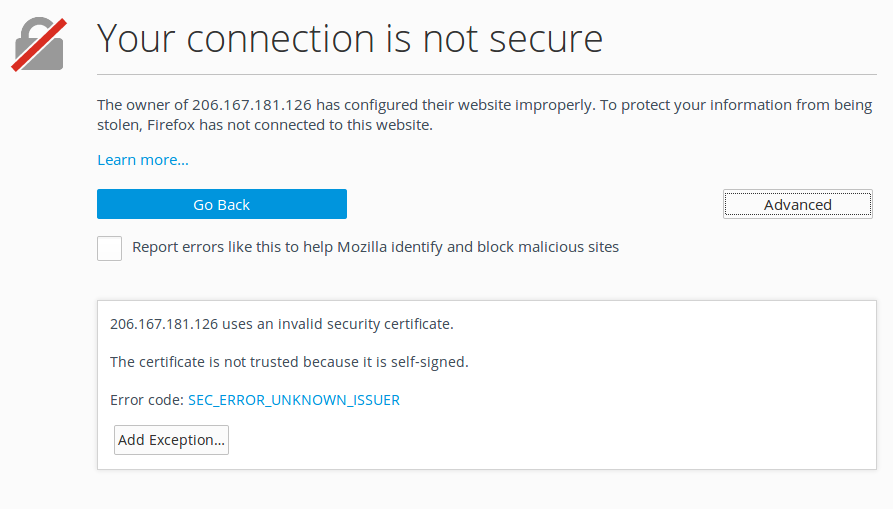
Click the Add Exception button. This will display the following form:
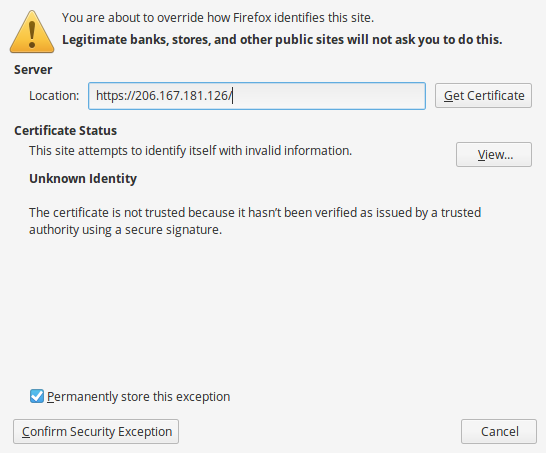
Click the Confirm Security Exception button. And, finally, you should be redirected to the encrypted version of your default webpage. Again, the reason you will be prompted (only the first time) for this much information is that your browser is trying to warn you that this SSL certificate was not issued by a trusted certificate authority. Which you already know… because you issued it yourself.
Key Points