Loading Structure Files and Interacting with Molecules
Overview
Teaching: 30 min
Exercises: 10 minQuestions
How to load PDB files into VMD?
How to view molecules interactively?
How to measure distances, angles and dihedrals?
Objectives
Learn how to load molecular structure files
Learn how to interact with molecules
Learn how get information about atoms and molecules
Learn how to measure distances, angles and dihedrals?
Starting VMD
Starting VMD on the training cluster
Open a terminal:
Applications –> System Tools –> Mate Terminal
On the training cluster, vmd is already installed. Just type “vmd” to run it.
Starting VMD on Windows
Use the VMD desktop launcher.
Important: On Windows VMD starts in the installation directory. Users don’t have permission to write in this directory, so to begin using VMD change to your home directory. You can do it by typing cd in the VMD command window.
VMD user interface
Three windows will open:
VMD OpenGL Display, display and interact with moleculesVMD Main, work with molecules and trajectories, start interfaces and extensionsVMD command window, show info and run text commands
Working with PDB files
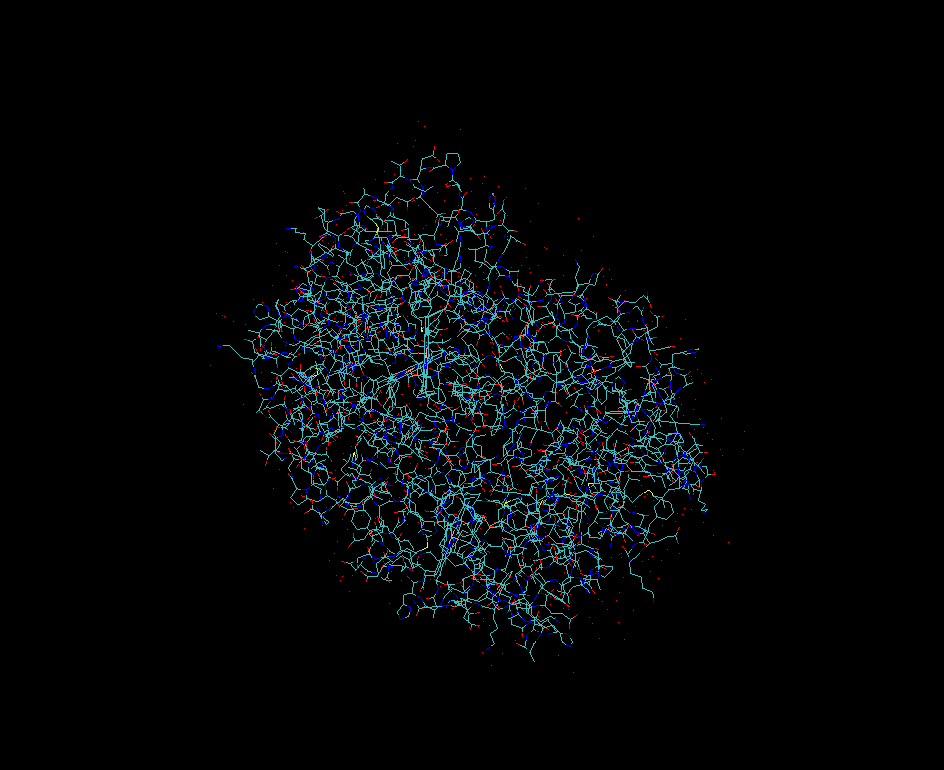
As an example will be using X-ray crystallographic structure of human hemoglobin 1SI4.
Downloading files from Protein Data Bank
VMD can directly query PDB database.
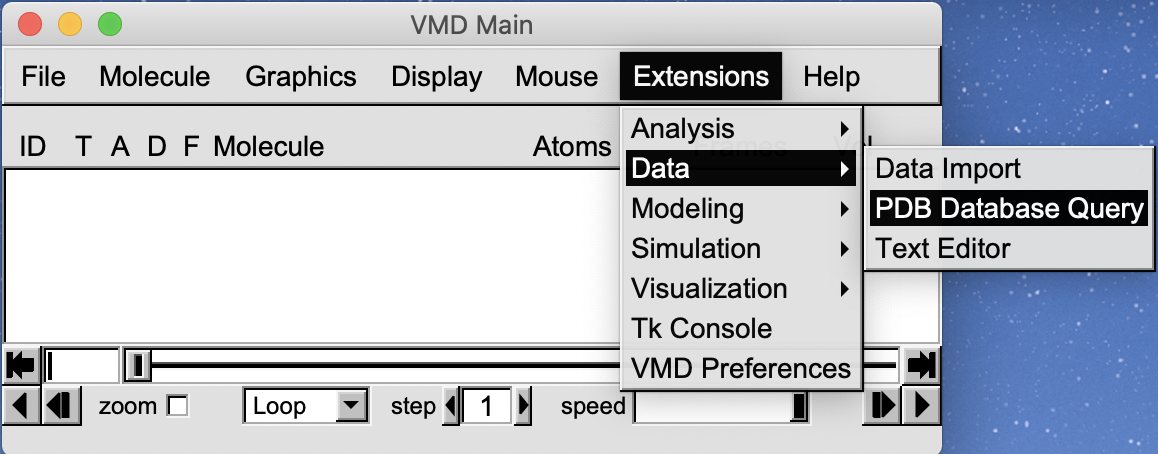
Enter “1si4” and click Load into new molecule in VMD.
Note: loading files from PDB is not possible from compute nodes on all clusters except Cedar because they are not connected to the Internet. Use the login nodes on these systems to download PDB files.
Opening a PDB file saved in your computer.
On a cluster you can download the example PDB file using the following command:
wget https://files.rcsb.org/download/1si4.pdb
If you are using VMD on your local computer you can navigate your browser to the URL above.
Once the file is downloaded, in the VMD Main window menu select File -> New Molecule. The Molecule File Browser window will open. Choose a molecule PDB file.
Understanding information about the loaded molecules
Load a second molecule (you can use the same pdb file), and make sure you have two molecules (ID 0 and 1) loaded.
VMD shows information about loaded molecules in its main window. This window displays:
- molecule ID
- molecule status [T A D F]
- molecule name
- number of atoms
- number of trajectory frames
- volumetric data
- current frame
There are four components to molecular status:
- T (top). Top indicates the default molecule used in the
moltext command. Only one molecule can be top. Some commands such as centering are applied only to the top molecule. - A (active). Several commands such as
Animateoperate on all active molecules. - D (drawn)
- F (fixed)
Fixing molecules
- Fix one of the molecules
- Try using mouse to rotate/translate molecules.
- Delete one of the molecules
Customizing VMD sessions
A few settings often need to be changed from the defaults.
Display rendermode GLSL
The GLSL mode turns on OpenGL extensions implementing programmable shading and transparency for higher quality molecular graphics. This mode renders faster and produces better images than “Normal” mode.- Load 6n4o.pdb file, and create a
NewCartoonrepresentation. Try rotating molecule and observe rendering speed. Is reasonable inNormalmode. - Add
licoricerepresentation. Rendering is very slow now. - Switch to GLSL mode. Performance is better now but still slow. It will improve if more CPUs are available, but the best of course is to use a GPU.
- Load 6n4o.pdb file, and create a
Display Projection orthographic
The orthographic projection allows us to get a better sense of the distance between objects and their relative sizes. The angle of view, distance, and focal length of a camera lens make lines of identical length appear different in perspective mode. Due to this, it is difficult to determine the relative size and dimensions of distant objects in perspective mode.Axes location off
In most cases you don’t want axes to appear in figures prepared for publication.Display depthcue off
The use of depth cues can enhance perception of depth and distance. This is achieved by blending distant objects into the background color. Most of the time, it is not desirable and there are better alternatives.Display ambientocclusion onandMol default material Diffuse
These ray-tracing options enable photorealistic rendering. More about this later.
Interacting with molecules
Obtaining good views for molecules
Rotate, zoom in/out, translate, and set rotation center to get a desired view. Pressing any of these keys switches the mode of interaction. For example, when s key is pressed mouse cursor will change. In this mode click, hold and move on a trackpad/mouse will zoom in/out. If you zoomed too much and don’t see the molecule simply press the = key to reset view.
| Action | Hot keys |
|---|---|
| Rotate | r |
| Zoom (Scale) | s |
| Translate | t |
| Reset View | = |
| Set Center | c |
Working with Graphical Representations
Creating and modifying graphical representations
In the Graphical representations window you can create representations for selected atoms, choose drawing styles and coloring methods
- Ensure 1si4.pdb is loaded
- Navigate to
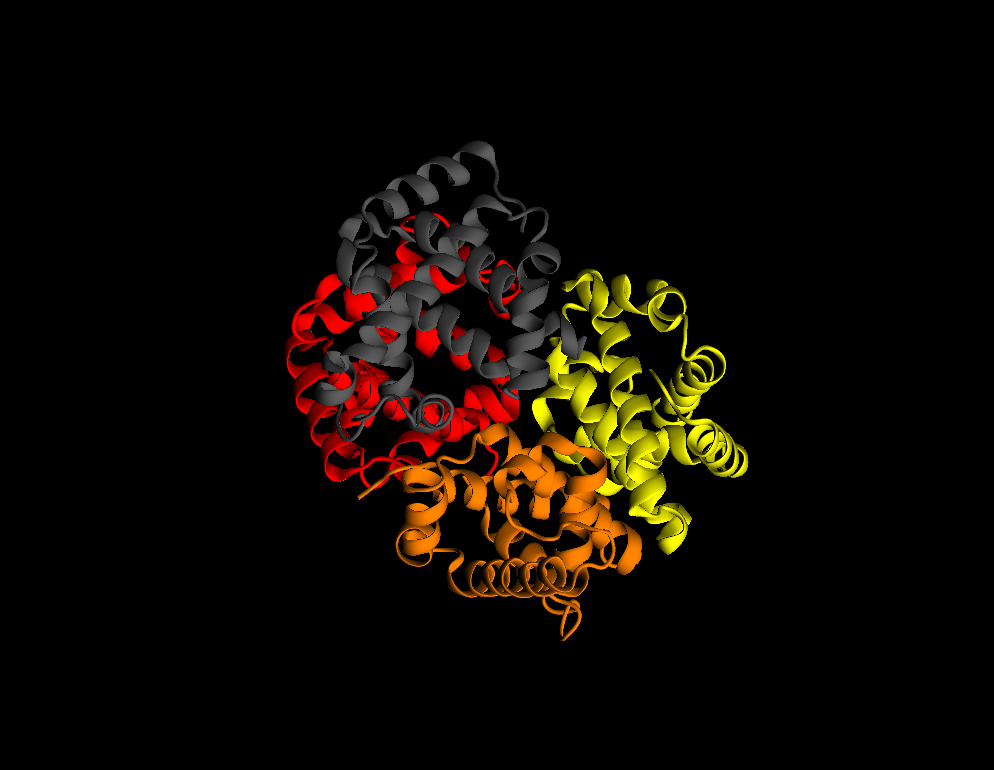
Graphics–>Representations - Change
Drawing MethodtoNew Cartoon - Change
Coloring MethodtoChain - Try to get a better illumination by moving lights:
Mouse->Move Light
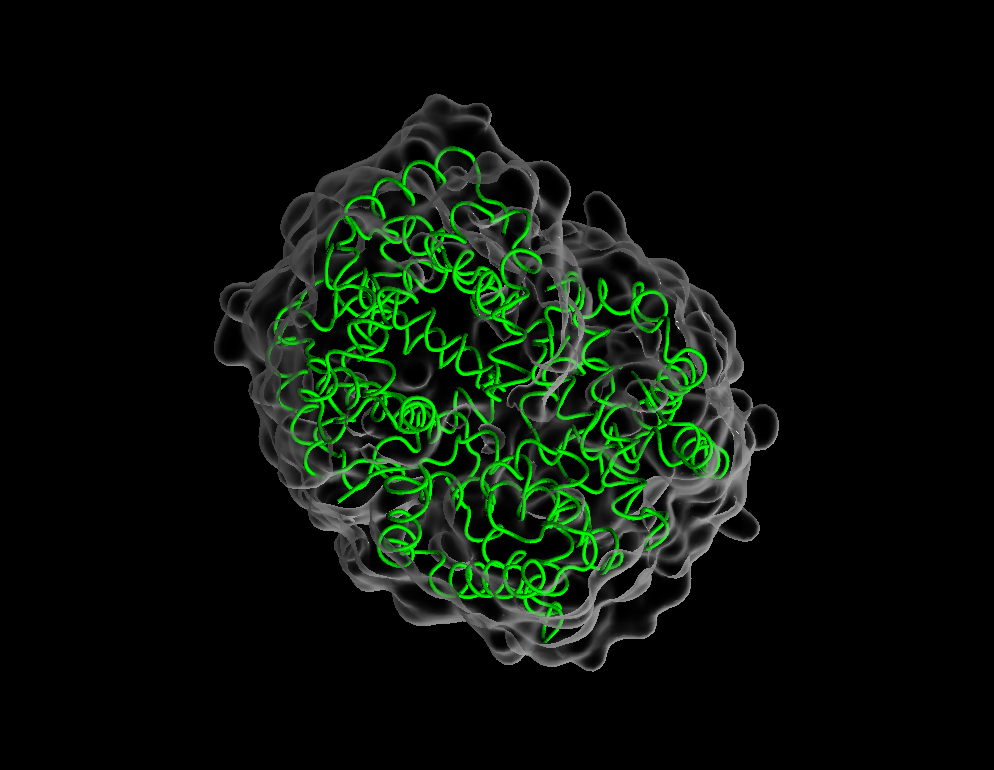
- Try another drawing method:
Drawing method–>Tube. - Create a new representation and change its drawing method to
QuickSurf. - Make the surface transparent by changing material to
GlassBubble - Double click to turn representations on/off without deleting them.
- Most useful draw styles:
NewCartoon,QuickSurf,Surf,Licorice,VDW,HBonds
Selecting atoms
In order to make a figure that is clear and impactful, it is useful to display different components of a system using different representations. Selecting groups of atoms is the key to achieving this. Selecting atoms is easy, with lots of options.
- Most often used selection keywords are
noh,backbone,protein,nucleic,resname,resid,index - Selecting a residue:
residue(starts from 0),resid(read from a file) - Selecting an atom:
index(starts from 0),serial(starts from 1) - Use logical operators (and, or, not) for complex selections
- Selecting hetero atoms:
not (protein or nucleic or resname HOH) - Limit selection to one monomer:
chain A - Selecting atoms based on distance:
within 5 of serial 93- selects all atoms located within 3 Angstrom of atom #93same residue as within 5 of serial 93- selects whole residues if any atom is within 5 A of atom #93.
- Selecting groups of atoms or residues
residue 0 to 10, 14, 15, 20 to 30
What selections are available in the loaded molecule?
In the Graphical representations window go to Selections–>Keyword–>chain.
VMD will display all chains in the selected molecule (A,B,C,D). Double click on the Value to select it. To select two or more chains you need to use a command.
Measuring distances, angles, and dihedrals
Use hot keys to measure distances, angles and torsions.
| Action | Hot keys |
|---|---|
| Print info about an atom | 0 |
| Label atom | 1 |
| Measure bond | 2 |
| Measure angle | 3 |
| Measure dihedral | 4 |
How to delete or hide Labels?
Labels can quickly clutter display. How to delete or hide Labels when you don’t need them anymore?
- Deleting labels:
Graphics–>Labels–>Delete
Challenge
Reproduce the following figure. In this image we see chain A of the pdb entry 1SI4.
The figure shows:
- protein (new cartoon)
- residue HEM (orange licorice)
- HEM atom FE (red CPK)
- HEM ligand residue HIS (yellow licorice)
- HEM ligand residue CYN (yellow VDW).
Use the following selection keywords:
chain,name,resname,same residue as within. You will also need to use logical operatorsand,not.Solution
select chain A
chain Anew cartoon, iceblue, aochalkyselect HEM
chain A and resname HEM
licorice, colorid 3, aochalkySelect atom FE
chain A and name FE
VDW scale 0.4, colorid 1, aochalkySelect only FE ligands
not resname HEM and same residue as within 3 of name FE and chain A
licorice, colorid 4, aochalkyThe previous command selected two FE ligands. How do we select only the small 2-atom FE ligand?
Pick any atom from this molecule. All information about the atom will be printed in the VMD terminal window.select CYN
chain A and resname CYN
surf, colorid 4, aochalky
- save your work:
File->Save visualization state.
Changing default colors
There are 1041 colors available in VMD, with color ids ranging from 0 to 1040. The first 33 are named colors. The remaining group of 1008 are colors used in color maps. There are no names for the specific colors in this group.
Each of the first 33 colors can be modified: Graphics–>Colors–>Color Definitions
Saving your work
- Saving VMD scene:
File->Save visualization state. - Restoring a visualization state:
File->Load visualization state.
A VMD state file is a TCL script that contains all commands used in creating a visualization. You add new commands to a visualization script as you work on it, so it becomes longer and longer. When VMD scripts are executed, they go through all your steps. It is common for intermediary steps to be just trial commands that are not needed to recreate the final version. For example, you created and then deleted some representations, changed colors several times.
In the future, you might want to reuse the visualization scene as a template for visualizing similar molecules. It is a good idea to inspect the visualization state file and keep only the commands necessary to recreate the final scene. In this way, it will remain clear and readable.
Customizing VMD sessions
At startup VMD load a set of default options. You may find that they are not optimal for your work, and you need to change them every time you start a new visualization. Once you have changed settings to your liking you can make them permanent.
Saving current settings
Using the following steps, you can save current settings:
Extensions->VMD Preferences -> Write setting to VMDRC
Managing VMDRC files
VMD preferences are saved in ~/.vmdrc file. VMD creates a very long file containing hundreds of all available settings, even the ones that are using global default values. You may find useful to create a short version of .vmdrc containing only settings that you want to change. A .vmdrc file is just a text file and it can easily be edited manually with any text editor.
Let’s open it. Settings are organized in sections. You don’t want to change default colors, materials or menus. So you can safely delete these sections and leave only display parameters and molecular representations.
As an example, a .vmdrc file might look like this:
      # VMD settings: file ~/.vmdrc

      # Turning-on of menus
      menu main on

      # Change display defaults
      display reposition 100 600
      display resize 672 682
      display projection Orthographic
      display depthcue off
      display rendermode GLSL
      display ambientocclusion on
      axes location Off
      color Display Background white

      # Default material
      mol default material Diffuse

      # Configure keyboard shortcuts
      user add key o {display projection orthographic}
      user add key p {display projection perspective}
Key Points